Showing posts with label Desserts. Show all posts

Wednesday, December 19, 2012

Peanut Butter Tart with Chocolate Ganache


This is another one of those Pinterest finds.  I saw this recipe and knew I wanted to try it.  Peanut butter and chocolate.  They should be best friends, and in this tart they are.  The shortbread crust is a nice foil to the rich peanut butter filling and decadent chocolate ganache topping.  This dessert is a showstopper!

Peanut Butter Tart with Chocolate Ganache

Crust:
10 ounces shortbread cookies, crushed
6 tablespoons butter, melted
Filling:
8 ounces cream cheese, softened
1 cup peanut butter
1 cup powdered sugar
2 tablespoons butter, softened
1 cup heavy cream, whipped
Glaze:
½ cup heavy cream
6 ounces semisweet chocolate chips

Crust:
Preheat oven to 350ºF. Spray a 9-inch tart pan with a removable bottom with cooking spray. Mix cookie crumbs with butter and press mixture evenly into pan. Bake for 8 minutes. Remove from oven and cool completely.

Filling:
Place cream cheese and peanut butter in mixing bowl. Beat with mixer on medium speed until well blended. Add the powdered sugar and butter and beat until fluffy. Thoroughly fold in half the whipped cream into the peanut butter mixture. Gently fold in remaining whipped cream. Spoon into crust and refrigerate until firm, at least 2 1/2 hours.

Glaze:
Heat 1/2 cup cream in microwave until very hot, about 1 minute and 15 seconds. Add chocolate chips and stir until smooth. If not already cool, cool until lukewarm and spread over peanut butter filling. Refrigerate until firm, at least 1 1/2 hours.


Notes:  This was LOVED in my house by ALL the inhabitants, young and old alike.  Be sure to use creamy peanut butter for a smooth and velvety filling.

Only 3 more recipes until Christmas!

Monday, December 03, 2012

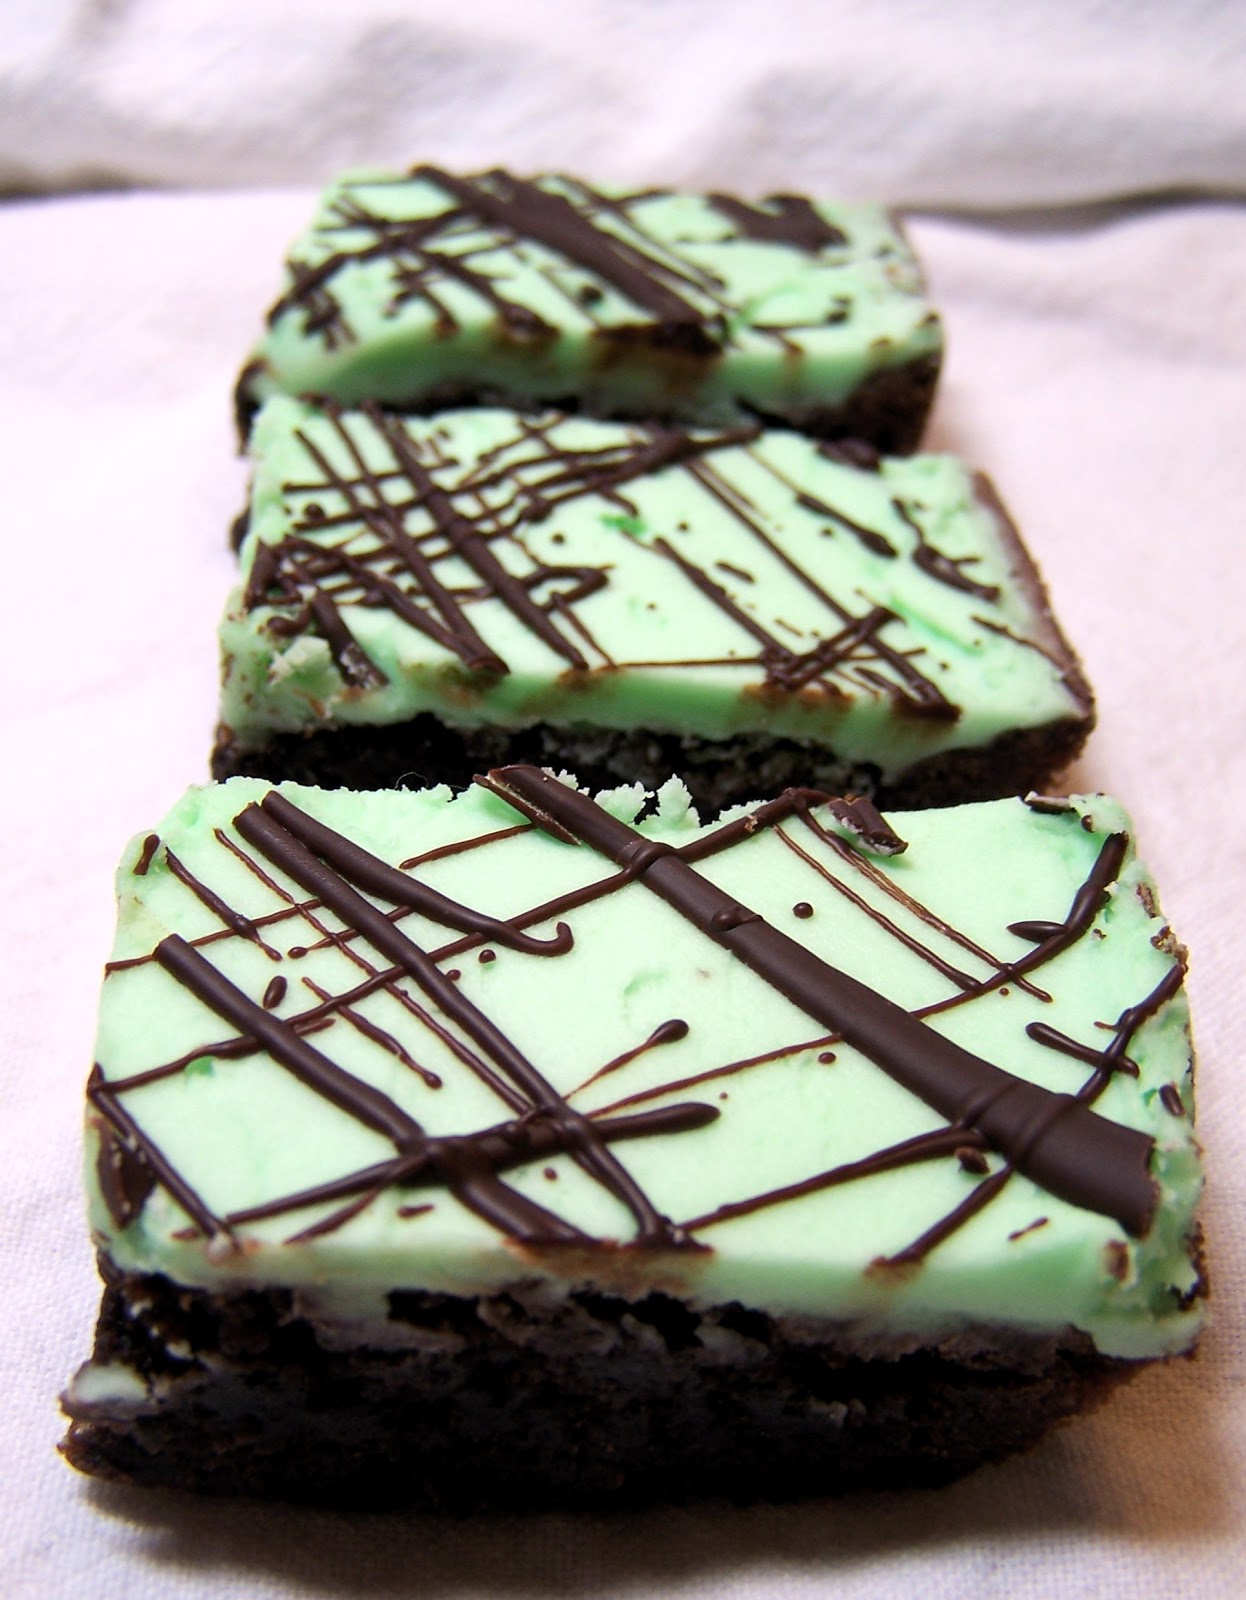
Mint Frosted Brownies

This recipe came about from a favorite brownie recipe called brownie meltaways.  That recipe is a box brownie mix doctored up with a homemade vanilla frosting and chocolate on top.  I changed the frosting to a mint flavor and adjusted the amount of chocolate on top and came up with these pretty and yummy brownie treats worthy of any Christmas gathering.


Mint Frosted Brownies

1 13x9-inch pan your favorite brownies
⅓ cup butter, softened
3 cups powdered sugar
¾ teaspoon peppermint extract
2 tablespoons milk
1 square (1 oz.) bittersweet chocolate
1 teaspoon butter

Prepare your favorite 13x9-inch pan of brownies, either from a mix or from scratch.  Cool completely.

Mix butter with electric mixer until fluffy. Add powdered sugar 1 cup at a time to butter and mix until incorporated. Add peppermint extract and milk. Mix until creamy and easy to spread. Spread over brownies. Refrigerate until frosting is firm, about 30 minutes.

Heat chocolate and 1 tsp. butter until melted. Drizzle chocolate in lines in one direction over frosting, then drizzle remaining chocolate in lines in the opposite direction of the first lines.

Refrigerate until chocolate is firm, about 10 minutes. Store in refrigerator.


Notes: These brownies are so easy and delicious.  Aren't those usually the best recipes? 

Come back tomorrow for a little giveaway I am having to celebrate my fifth year of doing the 12 Recipes of Christmas!

Only 11 more recipes until Christmas!

Friday, December 09, 2011

Flourless Chocolate Cake

 Well, I know I said the Cocomac Dreams were indulgent, and they are.  But this dessert, this is the most indulgent, rich, fantastic chocolate lovers dream that I've ever created.  I have for many years wanted to make a flourless chocolate cake.  I just never did.  Then, one of the women in our Bunco group discovered she had Celiac Disease.  So, instead of trying to make something separate for her to enjoy, I made something we all could enjoy.  Even though this dessert is gluten free, don't think for a minute that it is only for people with wheat allergies or issues.  This dessert will be sure to be a hit with all adults with taste buds.  It is that GOOD!


Flourless Chocolate Cake

½ cup water
¼ teaspoon salt
¾ cup sugar
18 ounces bittersweet chocolate
1 cup unsalted butter, softened
6 eggs, room temperature

Preheat the oven to 300ºF. Grease one 10-inch round springform pan. Wrap bottom and up the outside of springform pan in aluminum foil. Set aside.

In a small saucepan over medium heat combine the water, salt and sugar. Stir until completely dissolved and set aside.

In the top of a double boiler, melt the bittersweet chocolate. Pour the chocolate into the bowl of an electric mixer.

Cut the butter into pieces and beat the butter into the chocolate, one piece at a time until all the butter is mixed in. Beat in the hot sugar-water mixture. Slowly beat in the eggs, one at a time.

Pour the batter into the prepared pan. Put the springform pan into a larger cake pan. Fill the larger pan with boiling water until it reaches 1/3 to 1/2 of the way up the springform pan side.

Bake the cake in the water bath for 45 minutes. The center will still look wet. Remove pan from water bath and let cool for at least 30 minutes on wire rack. Refrigerate cake overnight in pan. To unmold, open springform pan and place on serving plate.

Yield: 1 10-inch cake (about 16 servings)


Notes:  I used as much Ghirardelli bittersweet chocolate I could find, which was 12 ounces.  Then I used 6 ounces of Nestle bittersweet bars.  I would just suggest to buy the best chocolate you can.  you may also want to sample the baking chocolates.  I found the Ghirardelli to be a bit more bitter than the Nestle, so I think the mix was nice.  Find what tastes good to you. 

Be sure your butter is at room temperature so it mixes easily into the chocolate.  I actually don't have my eggs at room temperature, but I do take them out of the refrigerator as soon as I start this recipe, so they have some time to warm up.  Finally, make sure your foil is large enough to cover the bottom of the springform pan so no water from the water bath can seep through.

This really is a rich, decadent cake.  Serve small slices with raspberry sauce and whipped cream.  It is divine!

8 more recipes and 16 more days until Christmas!

Tuesday, January 04, 2011

A Few Treats

Well I did get a little fancy over the holidays and made a few pretty treats to serve. My husband has a department work party where the company brings in the main dishes, but the employees (and/ or their spouses) send in desserts and goodies.

I made my chocolate chocolate chip cake with peppermint buttercream filling and chocolate buttercream frosting. I wanted to fancy it up a bit, so I made white chocolate mint snowflakes to put on the cake. I finished with the words "Let It Snow" on top. I tried to make the words sparkly by applying luster dust, which didn't go too well. But I was really pleased with the results and my cake won two categories in the employee voting. I won "most appealing to the eye" and "most festive." (I actually tied with three other people in one of those categories, but I can't remember which!)


I also finally made Bakerella's Cake Pop's that she has become so famous for! I decided to make buttermilk Devil's food cake for the base. I then crumbled half of the cake and mixed it with vanilla frosting. I mixed the other half of the crumbled cake with peppermint frosting. I dipped them in a mixture of chocolate bark and Ghirardelli's bittersweet chocolate. Then I sprinkled pretty Christmas sprinkles on top and then finished them with a Merry Christmas sign or red or green bow. I love how they turned out!


Now to start dreaming up my Valentine's treats!

Thursday, December 23, 2010

Truffle Fudge Brownies


Immediately when I hear "truffle" I think fancy. This is decadent and rich, and a little fancy. But most of all, it is luscious and chocolatey! How is that for a description of a dessert? I actually made this for my 15th wedding anniversary in June, but it would end a Christmas dinner very well. Dress it up with some Christmas sprinkles or leave it unadorned. Either way it will be a hit!


Truffle Fudge Brownies

for the batter:
4 tablespoons unsalted butter
3 ounces unsweetened chocolate, coarsely chopped
½ cup all purpose flour
¼ teaspoon baking powder
½ teaspoon coarse salt
1 cup sugar
2 large eggs
¼ cup whole milk
1 teaspoon vanilla extract
for the ganache:
4 ounces quality semisweet chocolate, coarsely chopped
⅔ cup heavy cream
for the garnish:
candy sprinkles (optional)

Preheat oven to 325ºF. Butter a 9-inch springform pan.

Make batter: Put butter and chocolate in a heatproof bowl set over simmering water; stir until melted. Let cool slightly.

Whisk together flour, baking powder, and salt in a bowl.

Put sugar and eggs in the bowl of an electric mixer fitted with the whisk attachment, and mix on medium speed until pale and fluffy, about 4 minutes. Add chocolate mixture, the milk, and vanilla, and mix until combined. Reduce speed to low. Add flour mixture; mix, scraping down sides of bowl, until well combined.

Pour batter into prepared pan. Bake until a cake tester inserted into brownies (avoid center and edges) comes out with a few crumbs but is not wet, 27-30 minutes. Let cool completely in pan on wire rack.

Make ganache: Put chocolate in a medium bowl. Heat cream in a small saucepan over medium-high heat until just simmering. Pour over chocolate; let stand 5 minutes. Gently stir until smooth. Allow ganache to cool, stirring every 10 minutes, until slightly thickened, 25 to 30 minutes.

Pour ganache over cooled brownies in pan; let set, about 20 minutes. Refrigerate until cold, 30 minutes to 1 hour. Let brownies stand at room temperature at least 15 minutes before serving. Scatter sprinkles onto brownies if using. Lift out brownies; cut into wedges, wiping knife with a hot, damp cloth between each cut.


Notes: This is another Martha Stewart recipe. She has the reputation she has for a reason! These are really fantastic and will impress any chocolate lover!


Only two days and one more recipe until Christmas!

Monday, December 20, 2010

Bavarian Apple Tart


I'm not sure what makes this tart Bavarian, but I don't really care. What I do know is that this dessert is not only delicious, but also beautiful to look at. It is a sweetened pastry crust, topped with a cheesecake like filling, and that topped with cinnamony apples. Yum!


Bavarian Apple Tart

½ cup butter, softened
⅓ cup sugar
1⅓ cups all purpose flour
¼ teaspoon vanilla extract
1 (8 ounce) package cream cheese, softened
¼ cup sugar
1 large egg
½ teaspoon vanilla extract
⅓ cup sugar
½ teaspoon cinnamon
3 Granny Smith apples, peeled and thinly sliced (4 cups)
¼ cup sliced almonds

Beat butter and 1/3 cup sugar in a small mixing bowl at medium speed with an electric mixer until fluffy. Gradually add flour, beating until mixture is blended. Stir in 1/4 teaspoon vanilla. (mixture will be slightly crumbly.)

Press pastry into bottom and 1 1/2 inches up sides of a lightly greased 9-inch springform pan.

Beat cream cheese and 1/4 cup sugar at medium speed until smooth. Add egg and 1/2 teaspoon vanilla, beating well. Spread filling evenly over pastry.

Combine 1/3 cup sugar, cinnamon, and apples, tossing lightly. Arrange apple slices over cream cheese mixture; Sprinkle with almonds.

Bake in preheated oven at 400ºF for 40 minutes. Cool on wire rack. Remove sides of pan. Serve warm or chilled. Store leftovers in the refrigerator.


Notes: I just had to add a second photo to show how pretty this dessert is on a plate! This is a lovely, fancy dessert that isn't too hard to make. I mixed the cream cheese filling in the same bowl that I made the crust in, no need to clean it first. I also had lots of apples and just layered them twice on top of one another. You will definitely impress people with this dessert!

Monday, November 24, 2008

My Son, The Chef

Ian is in fourth grade this year. That means he has to write four book reports each quarter, basically one very two weeks. They are easier than traditional book reports in that they are all worksheets that he has to fill out (answer questions) for. And, he can choose his own book. But, there are twenty different genres to choose from, and he can only do each genre once. It is a lot of work, but definitely exposes him to a wide array of literature.

We chose to complete this week's book report on a cookbook. On our bi-weekly outing to the library, I suggested he look at the cookbooks in the juvenile non-fiction area. He chose two that interested him, as well a book about sweet foods. He pored over each cookbook and decided he wanted to use the Pampered Chef Kids in the Kitchen Cookbook for his book report. I also suggested that he choose one recipe and he and I could whip it up together.

After careful consideration, he chose the chocolate chip cookie pizza recipe to make. I made sure we had all the necessary ingredients and on Saturday the two of us went to work. I made him read the recipe, pre-heat the oven, showed him how to measure the flour and other ingredients, and let him do the work. He was really excited and did a great job trying to mix everything with just the wooden spoon.

The final results turned out like this:


And it tasted as delicious as it looked!

Thursday, July 03, 2008

Cupcakes and Cousins

Last week my sister, Leanne, came from Ohio with her three kids and our mom for their annual visit. Ever since I moved out here in 2000, she's come every summer with her girls to visit. And it is such a blessing as my kids have gotten to know her kids well, and we get some well deserved sister time.


Leanne has three girls, ranging in age from 12 to 8. I have one boy, almost 9, and two girls, 6 and 4. Amazingly, they all pretty much get along great. Ian and my niece S get along great, or they don't. There's no in between. One year we saw them laughing and playing with each other one minute, and then literally rolling on the ground wrestling the next minute! But they always have fun, and despite being outrageously outnumbered, Ian finds ways to have fun with a bunch of girls. (I think it helps that he has two sisters.)

We had a fun week with two visits to the pool, playing on the "new" backyard playset my husband and father-in-law put together, going to the DuPage Children's Museum, making s'mores with our s'more maker and being treated to dinner out at TGIFriday's by our mom.

Every night the kids got a snack before bed, and being a cool and fun aunt, I wanted some yummy choices. One night it was the s'mores, another night it was ice cream, but on the first night I made special cupcakes for everyone. I always like to make at least one fun treat for their visit and this year was no exception. As I was searching for ideas on the internet I came across directions for making frog cupcakes. As soon as I saw it I knew that was what I was going to make. My niece, S, loves frogs. So it was a no-brainer. They turned out absolutely adorable and everyone was happy to gobble one down.


I guess now I need to start looking for fun snack ideas for next year!

Thursday, February 14, 2008

Valentine Dessert Preview


Here's a little sneak peak at the dessert I made for my family for Valentine's Day. It's called Heart Brownie Cupcakes. They were very easy to make and came out so cute. You can find the recipe here.

Wednesday, January 16, 2008

Dessert Preview

For Christmas this year one of my sister's kids had Zoe's name. So Leanne bought Zoe some cool things for her gift. There was a princess Barbie that could turn into a bride Barbie, two Strawberry Shortcake DVD's, and a Strawberry Shortcake Cookbook with three cookie cutters. Zoe immediately became enthralled with the cookbook, looking through each page and deciding whether or not she was going to make each dish. She corralled several of her aunts and her Grandma at various times during the party and made them look at the cookbook with her as she described how she would make each recipe with me.

Neither my sister or I knew what a hit this cookbook would be. The Barbie didn't get opened until our return to Illinois, but the cookbook was looked over several times before that (and since!).


So today we finally made our first recipe from the cookbook. It was called Pink Peppermint Pie. Zoe doesn't like peppermint ice cream, though, so we substituted vanilla with some red food coloring. Zoe scooped ice cream, squeezed food coloring and stirred the mixture together until the ice cream became smooth and pink. She then transferred the pink ice cream to the chocolate cookie crust we bought at the store and smoothed out the top almost all by herself. I unwrapped two cherry candy canes leftover from Christmas and she placed them on top of the cake to look like a heart, just like in the picture from the recipe. Our final touch was to add chocolate chips to the top, just for fun.

After determining that we better put the pie in the freezer or it would melt, Zoe cleaned the bowl of the leftover melted ice cream. Tonight after dinner we will enjoy Zoe's first dessert. I'm sure it will not be her last!